Showing posts with label craft. Show all posts

Thursday, November 22, 2012

DIY Burp Cloths |

I couldn't find any cheap burp cloths, and I figured they would be a handy item to have once the baby comes (so that I don't have to use larger receiving blankets that take up more space in my house, diaper bag and in the wash!)

So I decided to make some.  I had some left over cotton fabric from the baby's nursery and then got $9.50 worth of flannel fabric (elephant and plain white and coral) and was able to make 16 burp cloths! That is only 0.60cents per cloth!! MUCH cheaper than anything I was able to find in stores or online!

I followed THIS tutorial!

And here is how some of them look:


Tuesday, September 4, 2012

Pumpkins out of TP rolls! |

As September rolls around I get so excited about fall, my favourite time of year!

This year I came across these cute pumpkins made out of fabric and a toilet paper rolls!
 So simple and easy but they look so cute.

Here are how mine turned out:


Here is how I made them:
 
1. Choose three different fall fabrics - purcahse about 22 inches of the fabric - my fabric was 45 inches wide, SO I was able to make TWO pumkins out of one 22inch long piece, by simply cutting it in half. (So now I am able to give some as gifts too).

2. Place your piece of fabric face down on the table.

3. Scrunch up two pieces of tissue paper and then unfold them again placing them in the middle of the fabric. (This will give your pumpkin a bit more roundness).

4. Place a toilet paper roll in the middle of the tissue paper and fabric.

5. Start by tucking one corner of the fabric into the middle of the toilet paper roll, and continue tucking each corner in clockwise.

6. Use a piece of brown card stalk or brown paper bag rolled up a few times for the stem, OR you can even use a stick from outside. Simply insert the 'stem' into the middle of the pumpkin.

7. To finish it off I used wide green ribbon from the dollar store to make the leaves. I simply cut a piece of ribbon about 10 inches long and then stuck the ribbon under the stem before pushing the stem into the center of the pumpkin. I also tied twine and brown string to the stem to look like vines. I also want to add green floral wire to the stem and then curl it around a pencil to make it look like curly vines coming off the stem.

* Once fall is over you can simply unfold the pumpkins and keep the fabric and leaves/vines/stem in a bag and then next year simply recreate your pumpkins on new TP rolls!

Sunday, April 22, 2012

Mother's Day Sunday School Craft |

I was searching online for a good Mother's Day craft for our Kids Church program and I ended up merging together a few of the ideas that I came across, so I thought I would share the craft idea in case someone else out there is looking for a cute, meaningful and simple craft idea.

We needed something that was good for a wide age range of children (Toddler to age 8). We also wanted something that the kids could present to their moms when they come in at the end of the service on Mother's Day.

I came across this image about 'Good Roots' and that is what started the idea:

It is basically a foam flower (you can get them in a 20 pack at Michales Craft Store) that the kids can decorate with markers, stickers etc. Then you simply tape a wooden skewer to the back of the flower and then wrap a green pipe cleaner around it to make the stem. Then I created a tag that is to be tied to the stem with green ribbon (making the leaves).

The tag includes a scripture verse with a play on words: "Train up a child in the way they should "GROW", and they will not depart from it." Prov 22:6.
As well as the "Thanks for the good ROOTS Mom!" concept.

Here is the tag - feel free to copy it and print it for use if you wish to make this craft:


And here is how the final product will look:


Here are the kids making the flowers and telling us why they love their mom! This video was played in the morning service on Mother's Day right before the kids came in with their flowers:


Have FUN!

Wednesday, April 4, 2012

Decoupage Easter Eggs |


This year I thought I would try to make some pretty decor eggs that I could reuse every year as my table centrepiece.

I decided to Decoupage plastic eggs with fancy printed napkins.

HOW TO |

You will need a package of plastic eggs, colourful printed napkins (you can also use scrapbook paper or tissue paper) decoupage - OR I just used white glue mixed with a little water, and a brush.

After applying the ripped up pieces of napkin with glue/brush to the eggs I laid them to dry for about an hour.

I then placed them in my hurricane vase on top of some 'Easter Basket Straw'.

The nice thing about using the plastic eggs is that they won't start to smell or break, so I can bring them out every year as decor!


Here we are on Palm Sunday with a sign that I made for a photo booth at our church (slide show of church photo booth below).
Happy Easter Everyone!


Friday, March 9, 2012

Spring Umbrella Wreath |

This year I made a few Spring Umbrella Wreaths for myself, my mom, my aunts and my grandma.

They are super easy to create...

WHAT YOU NEED:
- An umbrella
- Ribbon
- Faux Flowers (of varying heights and types)
- A door hook
- Scissors

HOW TO CREATE YOUR OWN:
Simply turn the umbrella upside down and begin arranging your flowers in the umbrella. Once you have them how you want them simply tie a ribbon around the umbrella, making sure that it holds all of the stems in place. Then you are ready to hang your 'umbrella wreath' on your door (either inside or out!) making a lovely spring display of flower and classic wreath alternative.

HERE ARE A FEW THAT I MADE:

Blue & Yellow:

Multi-colour:


Purple Tone & Pink Tone Umbrellas:

Happy Crafting!


Monday, January 16, 2012

DIY T-Shirt Scarf |

I came across an image of a t-shirt scarf on a friend of a friend's facebook page (amazing the places facebook can take you and you can't remember how or why you got there).

I LOVED the look of it so I looked up more images/tutorials on how to make them and found a number of different sites, images and tutorials for various styles of t-shirt scarves!

I went to a second hand shop and got a few t-shirts and even found some old Ts around the house and got to work on creating my own.


Above is how mine turned out - I used two colours of T-Shirts and followed the below tutorial (Not the best lighting/quality vid but it gets the point across).


Next I want to try to make one of the 10 styles that I found outlined on My Blessed Life they are ALL so beautiful will be hard to decide which one to try!
Check out the post of the t-Shirt Scarves HERE.

Tuesday, July 19, 2011

Quick, Easy and Cute DIY Projects |

I found a few cute and easy DIY projects that I want to try soon and thought I would share:

Hankie Table Runner | I was recently given some antique hankies and I thought this would be a great use for them (since I don't plan to blow my nose with them) | Found HERE on Country Living

Multi Vase Flower Centre Piece | So easy to do and a great country cottage look. I would use a variety of vases and maybe even some mason jars putting the tallest vases in the middle surrounded by the shorter vases in the front | Found HERE on Country Living

Button Lampshade | I saw this DIY project in a book I got from the Library, but here is a photo of what they look like found HERE

Button Initial | I found this in Pretty Cute Pink's Shop on Etsy, but you can find the DIY instructions HERE | Very simple to do and would look really cute in a kids bedroom.

Lemon Strawberry Jar Cakes | Such a cute idea! Individual desserts served in mason jars | Recipe found HERE

Happy Crafting~!

Monday, April 11, 2011

Creative Crafter | Sarah Cashin

A lot of busy university students who also volunteer in various ways, who are involved in various groups, who have a job AND who are currently a Maid of Honor in a friend's wedding
MIGHT shy away from crafting.

But not Sarah, she is a great example of a "Creative Crafter on a budget" as she finds awesome items and ideas online and instead of buying them she makes them herself!


Some of Sarah's Recent Craft Projects...

Hexagon Afghan |

Sarah is currently working on a Hexagon pattern Afghan that to buy would cost on average of $200 with some larger afghans costing upward of $1,200!
She got the idea/inspiration from this site that gives step by step directions on how to create this pattern.

Despite the intricate look of this afghan, Sarah says that it is quite an easy pattern to crochet.

This DIY project is a great example of how something that looks difficult might actually be quite simple to craft yourself, not only saving you money but also giving you a great sense of satisfaction and pride knowing that the lovely piece on your couch or bed is a
hand-made creation.


Kusudama Flowers |

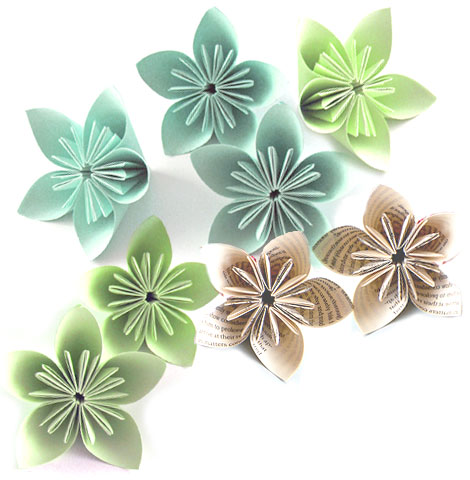
Sarah has also recently made Kusudama Flowers. She found the step by step instructions on this site making it easy to follow along and produce some really neat paper flowers.
Sarah made sets of 12 flowers and formed them into balls to hang up with ribbon, she also used them for Christmas gifts (making them in a Christmas color scheme).

Kusudama flowers can be used for many different things:

- Decorating a gift or card

- Hung as a garland, a room divider or as curtains

- Made into a hanging ornament (such a a Christmas ornament) or use the flower ball in a smaller scale for on the Christmas Tree.

- Used for jewelry such as broaches, earrings, rings or necklaces

- They also look nice just as individual flowers in a clear vase.

- And can also make beautiful bridal bouquets!

On average Kusudama floral bouquets cost $40.00 plus shipping - so if you can make them yourself for your wedding, or a friend's wedding, it is totally worth the effort.

The colours can be totally customized to fit the wedding decor and theme and interesting paper such as sheet music or pages from novels or the bible can also be used to create a personal and custom flare. (*Suggestion: Print out sheet music, novel pages, poems or bible passages on card-stalk from your home computer as apposed to ripping out pages from books) :D

Here are a few images showing how great Kusudama Bridal bouquets look!

Buy/View it HERE in 'Posh Studio's' Etsy Shop


Buy / View it Here in 'Posh Studio's' Etsy Shop

Buy / View it Here in 'Posh Mis Mosh's' Etsy Shop


Crocheted Shamrock Garland |


Sarah made Shamrock Garlands in honour of St. Patrick's Day. She found the 'how to' on this site that gives the step by step directions on how to complete the project.

This is an image of one of the garlands that Sarah made. She gifted this garland to her Irish landlord who just loved it!

Here is a close up of the crocheted Shamrocks:
A Similar Shamrock Garland costs $25.00 + Shipping on Etsy! Making this project a big money saver with only the cost of a ball O' yarn!

A few more cute crochet garlands:

View/Buy it HERE in "The Lovely Lily" Etsy Shop

View/Buy it HERE in "Maria Konstantin's" Etsy Shop

View/Buy it HERE in "Sycamore Lane's" Etsy Shop


Thanks for much for sharing your 'Crafty Ideas' Sarah! Your crafts provide some great examples of how crafting and DIY projects can save a ton of money and can give our homes a homey and handmade aesthetic for less!

Friday, April 1, 2011

DIY Party Tray |

I am having a family BBQ this summer in honour of my husband's birthday and I wanted a three tier tray to stack some goodies in, and OF COURSE I wanted it to match the party's theme so I decided to make my own.

I found these cute plastic dishes at Dollarama and thought they would make a great three tier tray and the colours and patterns were great for an outdoor, green themed, party!

I simply purchased two small glasses to use as the separators but you can use anything tall and skinny such as candle sticks to separate the tiers and can even find them at thrift stores and paint them in the colour you need them.

I simply glued the top and middle dishes to the glasses using contact cement (also purchased at Dollarama). I chose not to glue the rim of the glasses to the platters so that the tray can come apart and be easily stored and washed.

SO for $5.00 I got a really cute party tray that matches my theme!

Supplies Needed:

Glue the dishes to the top of the glasses/candlesticks with contact cement.


The finished Product!


You could use glass dishes as well for more fancy indoor events.
Here are some other DIY Party Trays for more ideas


My friend Ellyse made this adorable tray below using tea cups and saucers!! Such a cute idea, and boy do those cookies look yummy too!


A Cute and Colourful Party Tray with Glass candlesticks used for separators made by 'The Crafting Chicks'
. They displayed Easter goodies on their tray! To see more images and their 'How To' check out this Link


Hand painted Glass trays found on the Tatertots & Jello Blog


A three tier tray also found on the Tatertots and Jello blog - Made using three spray painted plastic 'silver trays' from the dollar store along with thrift store spray painted candle sticks.


This three tier square tray is really neat too. I LOVE how they used Ice Cream Sunday glasses to separate the tiers. Check out more images and get the 'How To' on Just Sew Sassy's Blog.


These DIY Trays are really cute as they have vibrantly coloured trays, purchased at Target. Check out the post on The Speckled Dog Blog to see how they were made!


Related Posts Plugin for WordPress, Blogger...

The Before & Afters of our Home


Home Improvements Slide Show

Click on the slideshow to open up a 'Gallery' mode where you can scroll through the images.

"Befores" - Images of our home when we bought it

In Front Of Our New Home!

In Front Of Our New Home!

Wish List For Our Home:

Wish List For Our Home:

Our New Home Songs |