Showing posts with label DIY project. Show all posts

Tuesday, September 4, 2012

Pumpkins out of TP rolls! |

As September rolls around I get so excited about fall, my favourite time of year!

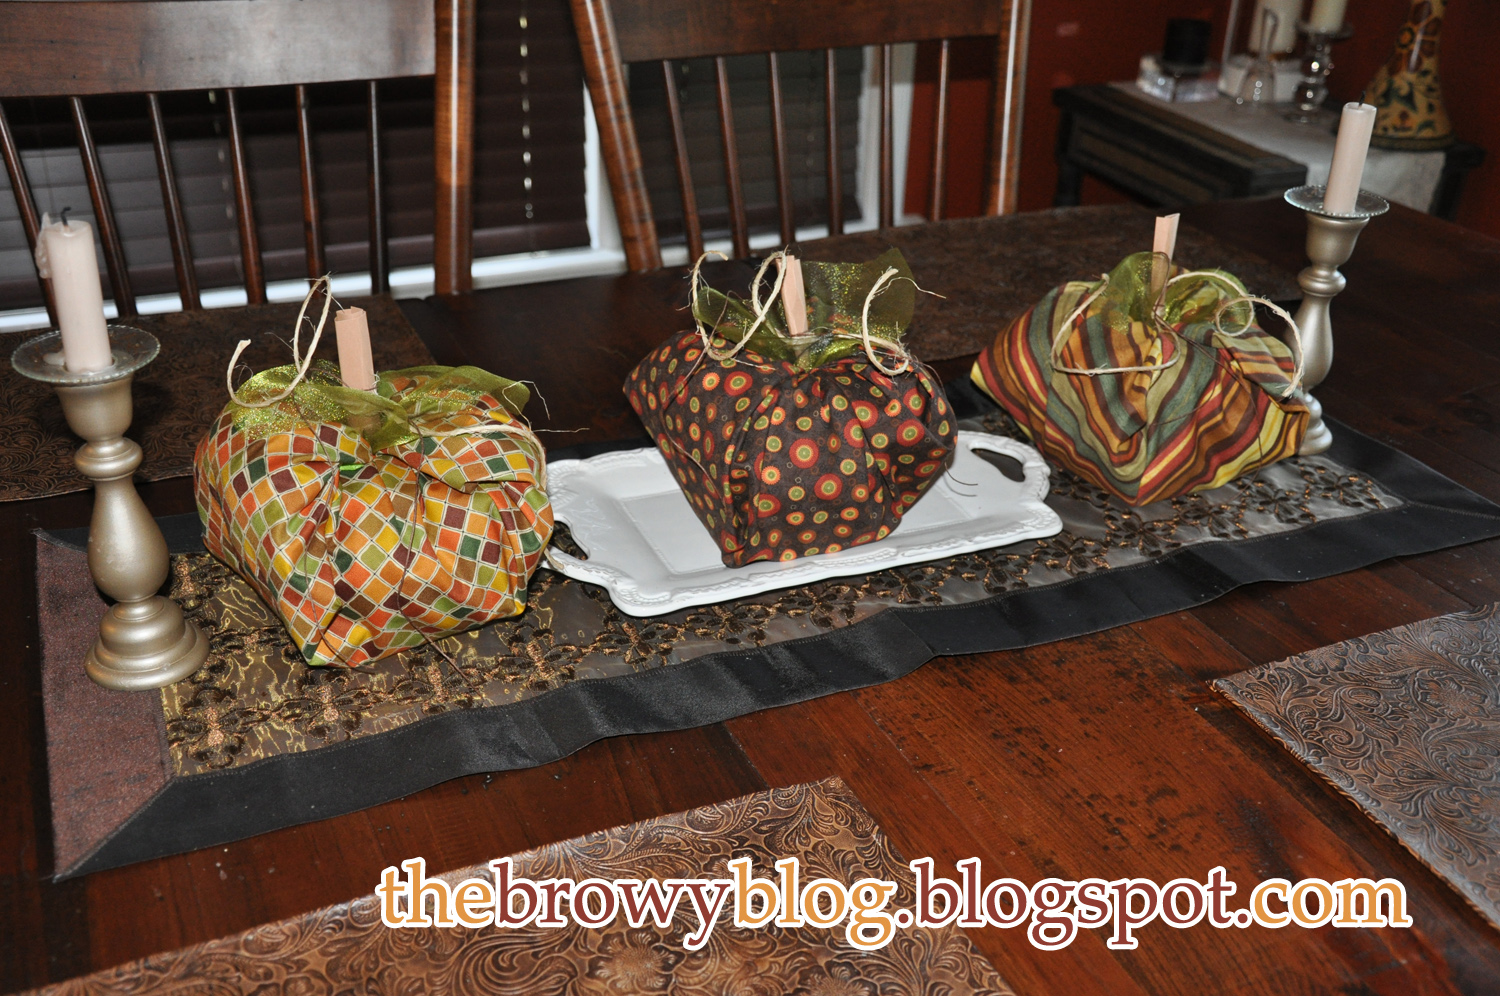
This year I came across these cute pumpkins made out of fabric and a toilet paper rolls!
 So simple and easy but they look so cute.

Here are how mine turned out:


Here is how I made them:
 
1. Choose three different fall fabrics - purcahse about 22 inches of the fabric - my fabric was 45 inches wide, SO I was able to make TWO pumkins out of one 22inch long piece, by simply cutting it in half. (So now I am able to give some as gifts too).

2. Place your piece of fabric face down on the table.

3. Scrunch up two pieces of tissue paper and then unfold them again placing them in the middle of the fabric. (This will give your pumpkin a bit more roundness).

4. Place a toilet paper roll in the middle of the tissue paper and fabric.

5. Start by tucking one corner of the fabric into the middle of the toilet paper roll, and continue tucking each corner in clockwise.

6. Use a piece of brown card stalk or brown paper bag rolled up a few times for the stem, OR you can even use a stick from outside. Simply insert the 'stem' into the middle of the pumpkin.

7. To finish it off I used wide green ribbon from the dollar store to make the leaves. I simply cut a piece of ribbon about 10 inches long and then stuck the ribbon under the stem before pushing the stem into the center of the pumpkin. I also tied twine and brown string to the stem to look like vines. I also want to add green floral wire to the stem and then curl it around a pencil to make it look like curly vines coming off the stem.

* Once fall is over you can simply unfold the pumpkins and keep the fabric and leaves/vines/stem in a bag and then next year simply recreate your pumpkins on new TP rolls!

Tuesday, July 19, 2011

Quick, Easy and Cute DIY Projects |

I found a few cute and easy DIY projects that I want to try soon and thought I would share:

Hankie Table Runner | I was recently given some antique hankies and I thought this would be a great use for them (since I don't plan to blow my nose with them) | Found HERE on Country Living

Multi Vase Flower Centre Piece | So easy to do and a great country cottage look. I would use a variety of vases and maybe even some mason jars putting the tallest vases in the middle surrounded by the shorter vases in the front | Found HERE on Country Living

Button Lampshade | I saw this DIY project in a book I got from the Library, but here is a photo of what they look like found HERE

Button Initial | I found this in Pretty Cute Pink's Shop on Etsy, but you can find the DIY instructions HERE | Very simple to do and would look really cute in a kids bedroom.

Lemon Strawberry Jar Cakes | Such a cute idea! Individual desserts served in mason jars | Recipe found HERE

Happy Crafting~!

Friday, July 8, 2011

My Water Garden |

I really wanted to have a small water feature on our deck as I love the relaxing sound of trickling water.

I looked up a lot of different tutorials and ways of making a fountain but a lot of them looked a little to involved, required tools that I didn't have, and were overall a bit too complicated for me, I just wanted to keep it simple.

So I purchased this lovely green terracotta pot at a local garden centre, (I even waited to get it for 60% off!) It had a small hole in the bottom for drainage to I also bought a tube of silicon and simply put a piece of tape over the bottom of the pot where the hole was an filled it with silicon.

I then purchased a simple 100amp pond pump from Rona that came with two different fountain nozzles - Bell and Trumpet. (Any higher amp would be too much, but a 50amp might also work depending on the size of the pot you have).

We placed two bricks that we had around the house in the bottom of the pot to place the pump on to make it the right height.

I then found 'Water Lettuce' which is the plant inside the water garden, for very inexpensive at another local garden centre.


You could also put a few feeder fish/gold fish in your water feature, they not only make it look nice and add to its style, but they also eat any misquotes that may try to use your water garden as a hatchery.

It was a really simple project and now we have the water garden on our deck that is lovely to listen to as we eat dinner outside.

Total cost around $45.00


The Two Different Types of Nozzles:


"Nothing in the world is as soft and yielding as the water from a fountain. Yet for dissolving the hard and inflexible, nothing can surpass the fountain"
Lao-Tze, Ancient Chinese Philosopher

Wednesday, April 20, 2011

DIY Pillow Covers |

I had purchased some pillows from Walmart when we first got out house. I thought they would match the colour scheme of the house, but once we got everything painted and decorated they really didn't match well! The style didn't compliment the design / feel of our living room either, and on top of all this the seems in the pillows were starting to fall apart!!

So I decide to 'up-cycle' and make pillow covers to put over top of the old pillows, using them as the 'pillow form' instead of buying new pillow forms.

I got the fabric at Fabricland and it was 40% off!! The colours of the stripes on the fabric match our wall colours perfectly. The yellow stripe is the exact colour of our living room walls, the brown ties in nicely with out couch colour and accents in the room, and the red stripe is the same colour as our dinning room (which is right across the hall).

The fabric is linen and so it goes a lot better with the casual / rustic / cozy style of our living room's decor!

I followed the tutorial below when making my 'Envelope' style pillow covers:


Here is what the old pillows looked like:


And here they are with the new pillow covers on them:


Friday, April 15, 2011

DIY Outdoor Pillows |

I have been on the search for outdoor pillows for a few weeks now.

I wanted pillows for on our new Muskoka chairs that we got for our back porch.
I also wanted the pillows to be green, to match our 'Green Party' that is coming up, and I wanted them to have a nice pattern to them as well (as apposed to plain green or simple stripes).

I was either finding really expensive outdoor pillows ($40 per pillow!!) or plain green pillows with basic stripes on them.

SO when I came across this gorgeous outdoor fabric at Fabricland I thought "Why don't I just make my own?"

It helped too that Fabricland is having a 'Birthday Sale' and all of their regular priced fabric is %40 off.
The pillow forms were also %40 off!

So I ended up getting 1meter of fabric (enough for two 16x16 pillows) for only $8.40 and then I got the two 16x16 pillow forms for only $11.39.

There was also enough fabric left over to make a table runner for our patio table - so now I will have a matching patio set.

So for $19.79 I got two really nice outdoor pillows and a table runner to match!

They only took me about 1 hour to make and I followed the 'Envelope Style Pillow Cover' method that I found on Youtube (tutorial below).


Here are how my pillows and table runner turned out:


The Table Runner:

Monday, April 11, 2011

Creative Women On A Budget | Main Post


I decided I wanted to do a post series on Creative Women who make fabulous items on a BUDGET !!

There are so many talented DIY ladies out there who have done some amazing projects on a budget who don't necessarily have the time to "BIY" (Blog it Yourself).


So I wanted to take the time to feature some of these creative women to inspire my blog readers with even more creative and inexpensive projects!


Here are a few of the posts so far...
Be the next on this list as it grows with more projects coming in!


"Creative Crafter" | Sarah Cashin

"Creative Mommy" | Janine Costello

"Creative Business Women" | Carolyn Hayes

"Creative Bride" | Lauren Brown

"Creative Quilter" | Debbie Lindsay

Creative Crafter | Sarah Cashin

A lot of busy university students who also volunteer in various ways, who are involved in various groups, who have a job AND who are currently a Maid of Honor in a friend's wedding
MIGHT shy away from crafting.

But not Sarah, she is a great example of a "Creative Crafter on a budget" as she finds awesome items and ideas online and instead of buying them she makes them herself!


Some of Sarah's Recent Craft Projects...

Hexagon Afghan |

Sarah is currently working on a Hexagon pattern Afghan that to buy would cost on average of $200 with some larger afghans costing upward of $1,200!
She got the idea/inspiration from this site that gives step by step directions on how to create this pattern.

Despite the intricate look of this afghan, Sarah says that it is quite an easy pattern to crochet.

This DIY project is a great example of how something that looks difficult might actually be quite simple to craft yourself, not only saving you money but also giving you a great sense of satisfaction and pride knowing that the lovely piece on your couch or bed is a
hand-made creation.


Kusudama Flowers |

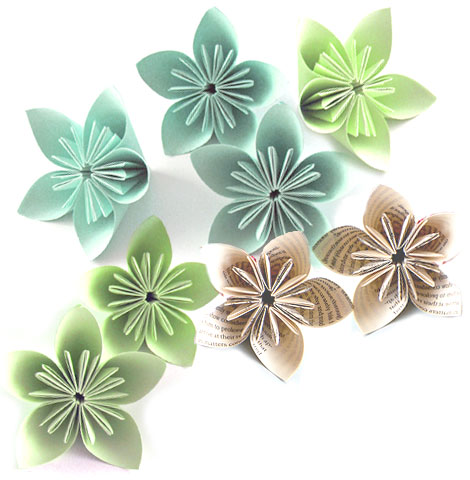
Sarah has also recently made Kusudama Flowers. She found the step by step instructions on this site making it easy to follow along and produce some really neat paper flowers.
Sarah made sets of 12 flowers and formed them into balls to hang up with ribbon, she also used them for Christmas gifts (making them in a Christmas color scheme).

Kusudama flowers can be used for many different things:

- Decorating a gift or card

- Hung as a garland, a room divider or as curtains

- Made into a hanging ornament (such a a Christmas ornament) or use the flower ball in a smaller scale for on the Christmas Tree.

- Used for jewelry such as broaches, earrings, rings or necklaces

- They also look nice just as individual flowers in a clear vase.

- And can also make beautiful bridal bouquets!

On average Kusudama floral bouquets cost $40.00 plus shipping - so if you can make them yourself for your wedding, or a friend's wedding, it is totally worth the effort.

The colours can be totally customized to fit the wedding decor and theme and interesting paper such as sheet music or pages from novels or the bible can also be used to create a personal and custom flare. (*Suggestion: Print out sheet music, novel pages, poems or bible passages on card-stalk from your home computer as apposed to ripping out pages from books) :D

Here are a few images showing how great Kusudama Bridal bouquets look!

Buy/View it HERE in 'Posh Studio's' Etsy Shop


Buy / View it Here in 'Posh Studio's' Etsy Shop

Buy / View it Here in 'Posh Mis Mosh's' Etsy Shop


Crocheted Shamrock Garland |


Sarah made Shamrock Garlands in honour of St. Patrick's Day. She found the 'how to' on this site that gives the step by step directions on how to complete the project.

This is an image of one of the garlands that Sarah made. She gifted this garland to her Irish landlord who just loved it!

Here is a close up of the crocheted Shamrocks:
A Similar Shamrock Garland costs $25.00 + Shipping on Etsy! Making this project a big money saver with only the cost of a ball O' yarn!

A few more cute crochet garlands:

View/Buy it HERE in "The Lovely Lily" Etsy Shop

View/Buy it HERE in "Maria Konstantin's" Etsy Shop

View/Buy it HERE in "Sycamore Lane's" Etsy Shop


Thanks for much for sharing your 'Crafty Ideas' Sarah! Your crafts provide some great examples of how crafting and DIY projects can save a ton of money and can give our homes a homey and handmade aesthetic for less!

Creative Mommy | Janine Costello


This is Janine and her adorable son Isaiah!

Janine is a
GREAT example of a "Creative Mommy on a Budget" as she has completed many beautiful DIY projects to giver her son's nursery a unique, custom, homey and inviting feel that looks so high-end but is in-fact DIY on a budget. She has also created some adorable clothing items for her son that make him the most stylish baby in town!

Below are photos and descriptions of her awesome projects! And be sure to see the photos at the end of the post of how the overall nursery came together!

Baby Quilt|

I bought half a meter of 6 different materials, and two meters of a solid material for the back. I also bought piping for the edges. I cut the squares 6x6 and arranged them all on the floor. Then starting at the top I sewed row by row. I then cut the back panel 3 inches larger than the front panel on all sides. I placed quilt batting between the two layers and attached the edges of the back to the front using piping. I then top-stitched about one inch from the edge.

The material was about $10 a meter on average so I spent about $50 on material, $15 on piping, $7 on batting and $3 on thread. So the total for this project was about $75. However, I had extra material left over that I was able to make other projects for the nursery with.

I used ideas from three different quilts I found online to create mine, taking different aspects that I liked from each of them. They ranged from $120-$200 in cost!

Savings: $175.00!

Jungle Paintings|

I found a picture of similar paintings on the Internet and printed it off.
I bought 3 white canvases and drew the pictures directly onto each canvas and then painted the pictures.

The cost was $10 for the canvases (I already had paint and brushes).

Similar paintings retail for about $50 for the collection!

Savings: $40.00

Wooden Baby Name Letters |

I purchased the letters for my son’s name at Dollar Giant and painted them green. I bought brown ribbon from Walmart and cut 1-foot pieces (2 for each letter). Using a hot glue gun, I glued one end of each ribbon to the back of the letters, so each letter had two long pieces hanging off. I then tied the two pieces in a bow.

Buying custom wooden letters online cost anywhere from 6$-8$ per letter which would mean Isaiah's name would cost on average $42.00 plus shipping!

Savings: $32.00


Toy Sling |

I used left over material from the quilt to make this awesome Toy Sling for the side of Isaiah's Crib.

1. I sewed two large half circles together, leaving the flat edge open.

2. I took 2 long pieces of material (about 4 feet long each) and folded

them in half (pretty sides together) and sewed along the open seam

3. Then, using a safety pin, I pulled the material through so the right sides were facing out making 2 tubes.

4. I then attached piping to each side of the half circles’ open edges.

5. I centered and pinned the tubes on the half circles so about 1 foot of material was hanging from each side.

6. I attached the tubes to the other side of the piping. The tubes work as the ties to attach the sling to the crib.

Since I used leftover material the cost was $0!!

However, about 1 meter of solid material would be needed for the sling and approx. half a meter for the ties and some piping. So it would around $15-$20 to make if you have to buy the material.

Toy slings cost about $60 at Sears.

My Savings: $60.00!

Your Savings (if material needed to be purchased): $40.00

Personalized Laundry Bag |

My son had no place for dirty laundry in his room, so using leftover material from the quilt, I sewed a large drawstring bag.
I personalized it by adding a block with the letter “I” for my son’s name.
I top stitched the block and letter on to the bag.

The cost of the project was $0 as I used scrap material!

However it would probably cost around $10 if one had to buy the material.

Handemade Baby Laundry bags on Etsy cost $40.00 on average.

My Savings: $40.00

Your Savings (If materials need to be purchased): $30.00


Snake Stuffed Animal |


For Valentine’s Day I decided to make by son a homemade gift.
I had left over material from curtains I sewed for his room, the material reminded me of a snake, and since his room was jungle themed I decided to make him a giant stuffed snake.

I cut two long pieces of material in the shape of a wide snake. Then placing right sides together I sewed the pieces together but left the mouth opening un-sewn. I then top stitched a heart on the side of the snake and hand stitched the eyes on (I used beads). I then took 2 pieces of material and sewed a tongue and attached it to the center of the mouth. I then stuffed the snake and hand stitched the mouth closed.

This project would cost approximately $10-15 for material and stuffing.

I found a similar Snake Sutffed animal on Etsy for $19.00 plus $12.00 shipping ($31.00)

My Savings: $31.00

Your Savings (If material needs to be purchased): $21-$16


Little Man's Hat & Tie |


For Easter I wanted to dress my little boy up for church. So I decided to make him a hat and tie.
I bought a pattern on Etsy for $8, the pattern included both the hate and tie.
I found the patterns to be VERY easy to follow taking me about 3 hours to complete both projects.

The cost was about $20 total, for the pattern, material and notions. I purchased the amount of material recommended by the pattern and have PLENTLY left over so I plan to make some hats and ties for gifts in the future.

To buy a hat and tie like this would be an average $40.00

Savings: $20.00


Tie Onesie |


I bought a package of plain white onesies and using left over material from another project cut the material in the shape of a tie.
I then zigzagged the “tie” to the onesie.
VERY easy to make.

I have seen these sold at craft sales and mom to mom shows. They usually cost between $10-20. I bought a package of 6 onesies for $12 and used scrap material for the tie. So the cost per shirt was about $2 a great gift idea!

Savings: $10

Brown Dress Pants |

I had left over material from the hat and decided to make matching pants. I bought a pattern from Etsy, the pants were VERY easy to make, taking less than 2 hours.

I added a blue trim to the pockets to match them with the tie and hat I had already made.

The pattern cost $4 and I bought elastic for the waistline.

Using left over material this project cost me $5. Most baby pants cost about $15.

Savings: $10


My Total Savings on all of these awesome DIY projects: $418.00!

WOW Janine, you have done a fabulous job in creating some awesome, custom & unique items for your sweet baby and I am sure you are an inspiration to young moms everywhere showing them that they can DIY on a budget to get high end looks for their babies at a lower cost.

I am sure Isaiah will grow up knowing that he is truly loved and cared about because of all of the time and effort you put into hand-making all of these items especially for him!


Check out Janine's Blog HERE
Related Posts Plugin for WordPress, Blogger...

The Before & Afters of our Home


Home Improvements Slide Show

Click on the slideshow to open up a 'Gallery' mode where you can scroll through the images.

"Befores" - Images of our home when we bought it

In Front Of Our New Home!

In Front Of Our New Home!

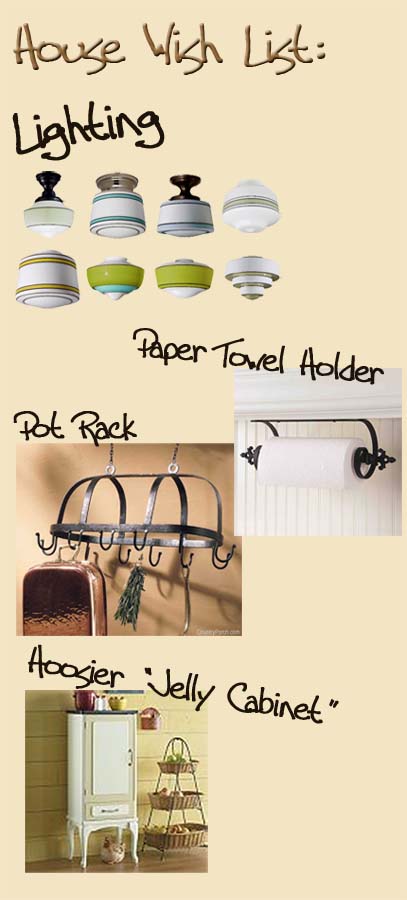
Wish List For Our Home:

Wish List For Our Home:

Our New Home Songs |